Visual Progress Tracker for Jira — Documentation
Complete Setup Guide
Contents
1. Overview
Visual Progress Tracker adds color-coded progress bars directly to your Jira issues. Choose from three field types to match how your team tracks work:
- Manual Progress Bar — Drag a slider to set any percentage (0–100%).
- Status-Based Progress — Automatically maps workflow statuses to percentages.
- Subtask Progress — Automatically calculates completion from resolved subtasks.
All three types display a colored bar that shifts from red to yellow to green as progress increases — giving your team instant, at-a-glance visibility.
2. Installation
Step 1 — Install from Marketplace
- Go to Visual Progress Tracker on the Atlassian Marketplace and click Get it now.
- Click Get it now (or Try it free for the Advanced edition).
- Select your Jira Cloud site and confirm the installation.
Step 2 — Verify Installation
- In Jira, click Apps in the top navigation bar.
- You should see Visual Progress Tracker in the dropdown. Click it to open the Admin Settings page.
3. Adding Progress Bar Fields
After installation, you need to add the progress bar fields to your Jira projects.
How to Add a Custom Field
- Go to Jira Settings (gear icon) → Issues → Custom fields.
- Click Create custom field.
- In the search box, type
Progress Bar. You will see the three available types:- Progress Bar (Manual)
- Progress Bar (Status)
- Progress Bar (Subtasks)
- Select the field type you want, give it a name (e.g., "Progress"), and click Create.
- Choose which screens the field should appear on (recommended: all screens).
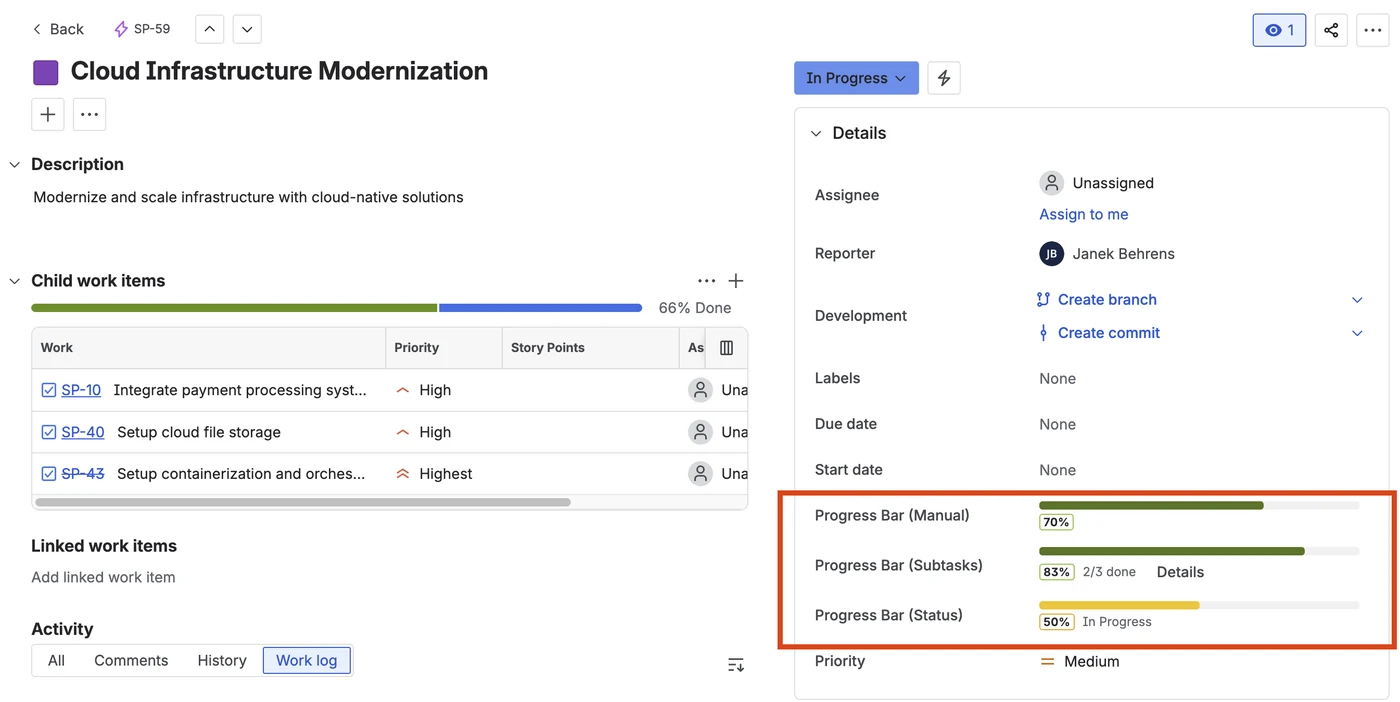
4. Field Type 1: Manual Progress Bar
The Manual Progress Bar lets users set the progress percentage by hand. This is ideal for tasks where completion is subjective or estimated.
How it Works
- Open any Jira issue that has the manual progress bar field.
- You will see a colored progress bar with a drag slider.
- Drag the slider left or right to set the percentage (0–100%).
- The value saves automatically.
Use Cases
- Design work, content creation, or other tasks with subjective milestones.
- Teams that want simple, quick progress tracking without automation.
- Combining with other estimation methods (story points, hours).
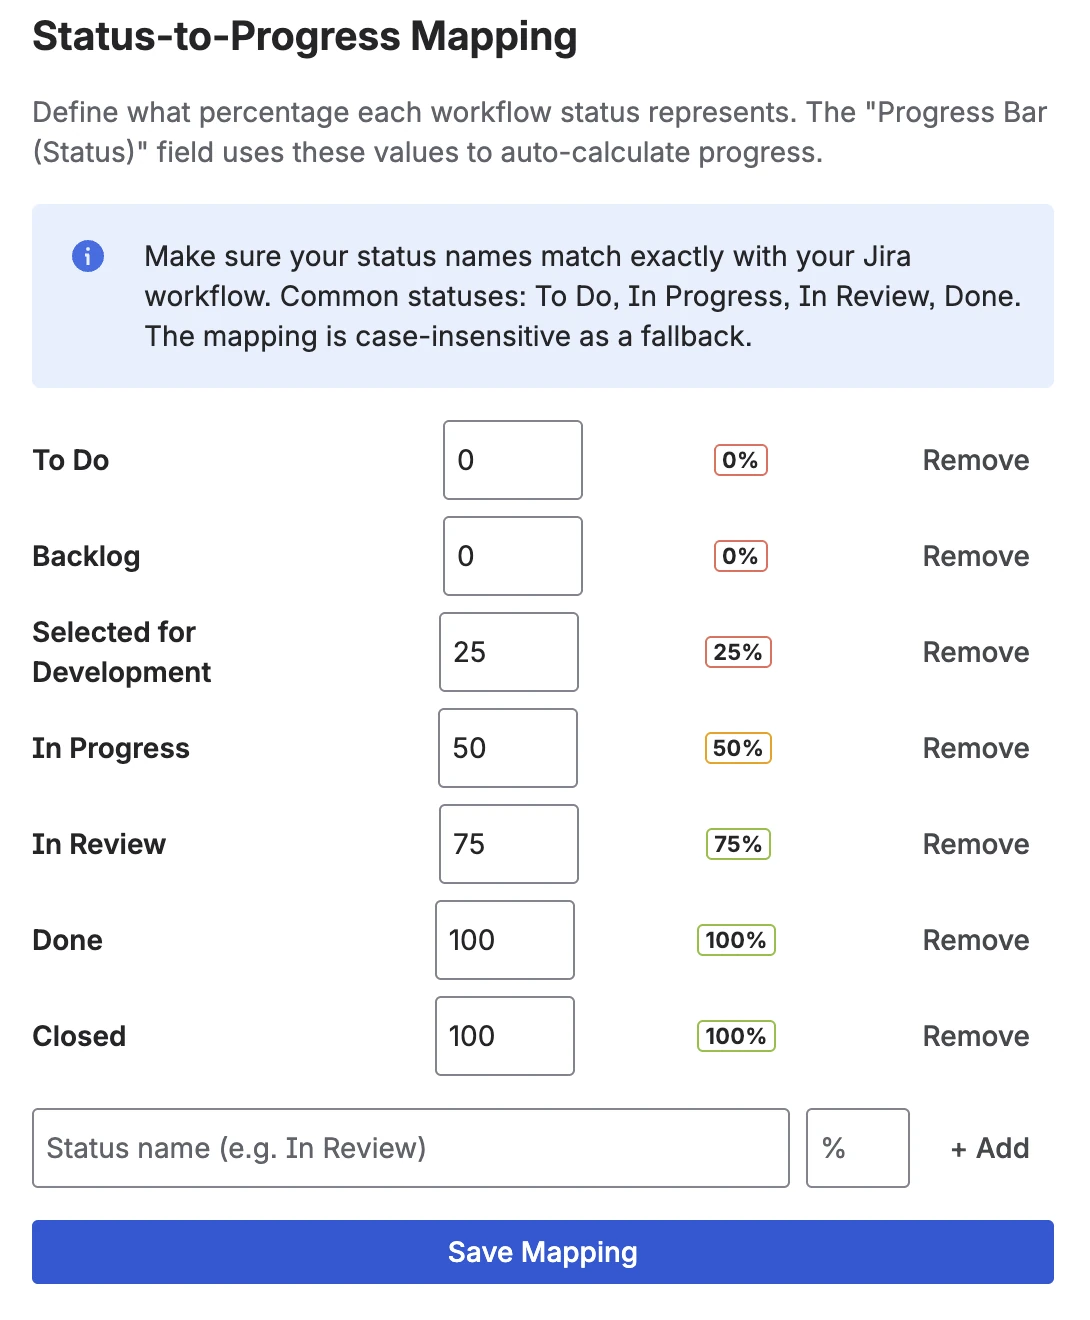
5. Field Type 2: Status-Based Progress
The Status Progress Bar automatically calculates a percentage based on the issue's current workflow status. You configure which status maps to which percentage.
How it Works
- Open the Admin Settings page (Apps → Visual Progress Tracker).
- In the Status Mapping section, you'll see your workflow statuses listed.
- Assign a percentage to each status (e.g., "To Do" = 0%, "In Progress" = 50%, "Done" = 100%).
- Click Save.
- Now every issue with the Status progress bar field will automatically show the mapped percentage.
Use Cases
- Teams with well-defined workflows where status = progress.
- Sprint tracking — instantly see where every issue stands.
- Reporting dashboards that need automated, consistent data.
6. Field Type 3: Subtask Progress
The Subtask Progress Bar automatically calculates the percentage of resolved child issues (subtasks). No configuration needed — it works out of the box.
How it Works
- Add the Subtask progress bar field to a parent issue that has subtasks.
- The bar automatically shows:
(resolved subtasks / total subtasks) × 100%. - When you open the issue, the bar recalculates automatically and shows the latest progress.
Example
A story has 4 subtasks. 2 are resolved, 2 are open → the bar shows 50% in yellow. When all 4 are done → 100% in green.
Expanding Subtask Details
Click the Details button on the issue view to expand a breakdown of all child issues, showing each one's individual progress and status. Click Hide to collapse.
Use Cases
- Epic or story tracking with subtask breakdowns.
- QA checklists — split testing tasks into subtasks and watch progress fill up.
- Onboarding or setup tasks with multiple steps.
7. Viewing Progress in List View
All three field types are visible as columns in Jira list view, giving you a project-wide overview of progress across all issues.
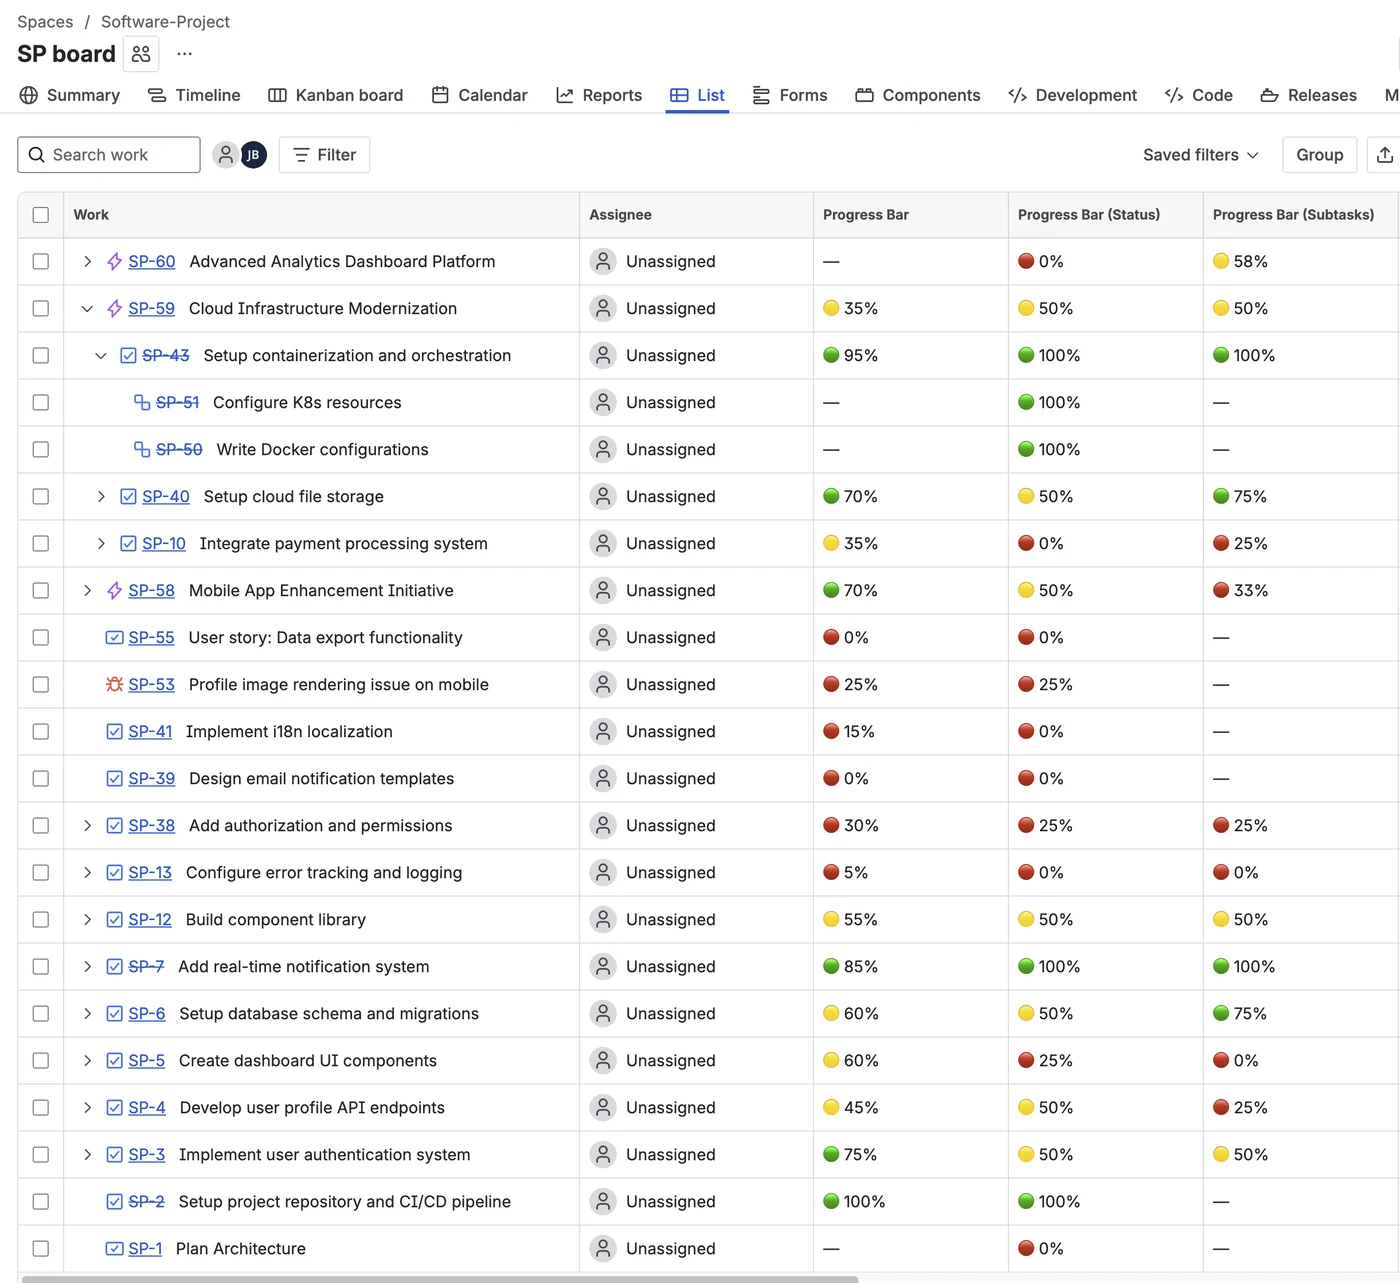
How to Add the Column
- Open a project's List View (or Backlog).
- Click the Columns icon (or right-click a column header).
- Search for the name of your progress bar field.
- Check the box to add it as a visible column.
8. Admin Settings
Access the settings page from Apps → Visual Progress Tracker in the top navigation bar.
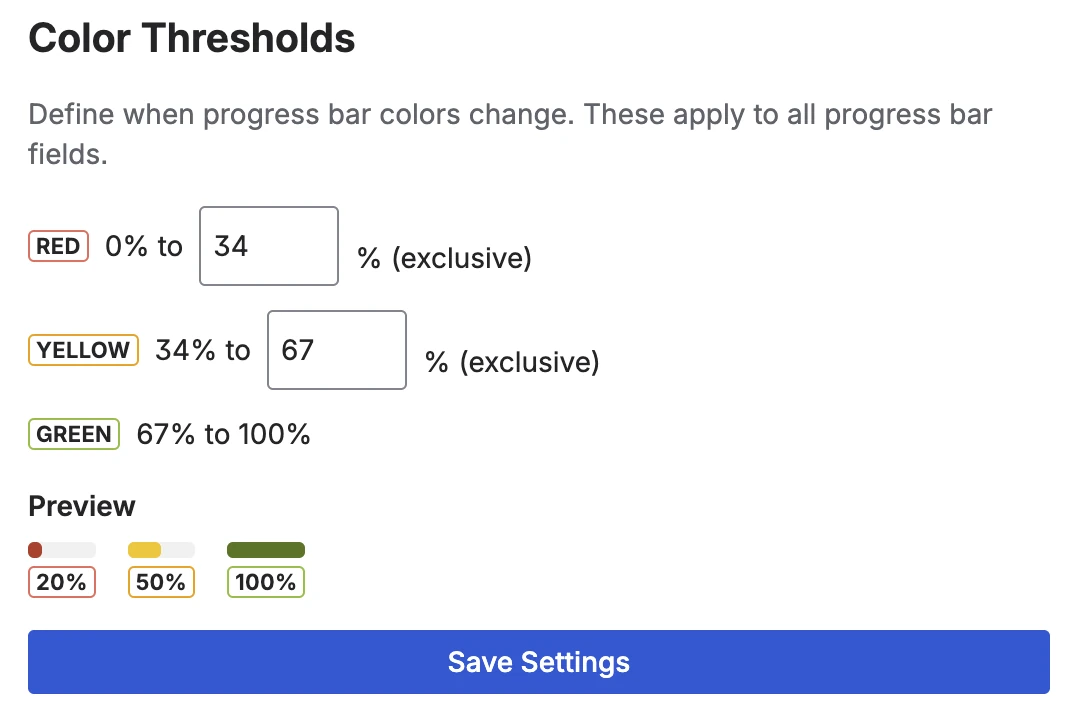
Color Thresholds
Customize when progress bars switch colors. Default values:
- Red — 0% to 33%
- Yellow — 34% to 66%
- Green — 67% to 100%
Adjust these thresholds to match your team's expectations. For example, set the green threshold to 80% if you only want bars to turn green near completion.
Status Mapping
Map each Jira workflow status to a percentage. This drives the Status-Based Progress field. Click Save after making changes.
Field Sync (Recalculate)
Use the Recalculate All Fields button to bulk-update all Status and Subtask progress fields across all projects. This is useful after changing status mappings or when first setting up the app.
To keep resource usage low, recalculation is limited to once every 7 days. When the button is on cooldown, the page shows the date when the next run will be available.
9. Dashboard Gadget
The Progress Tracker Overview dashboard gadget shows a table of all issues in a selected project with their progress values — perfect for team leads and stakeholders.
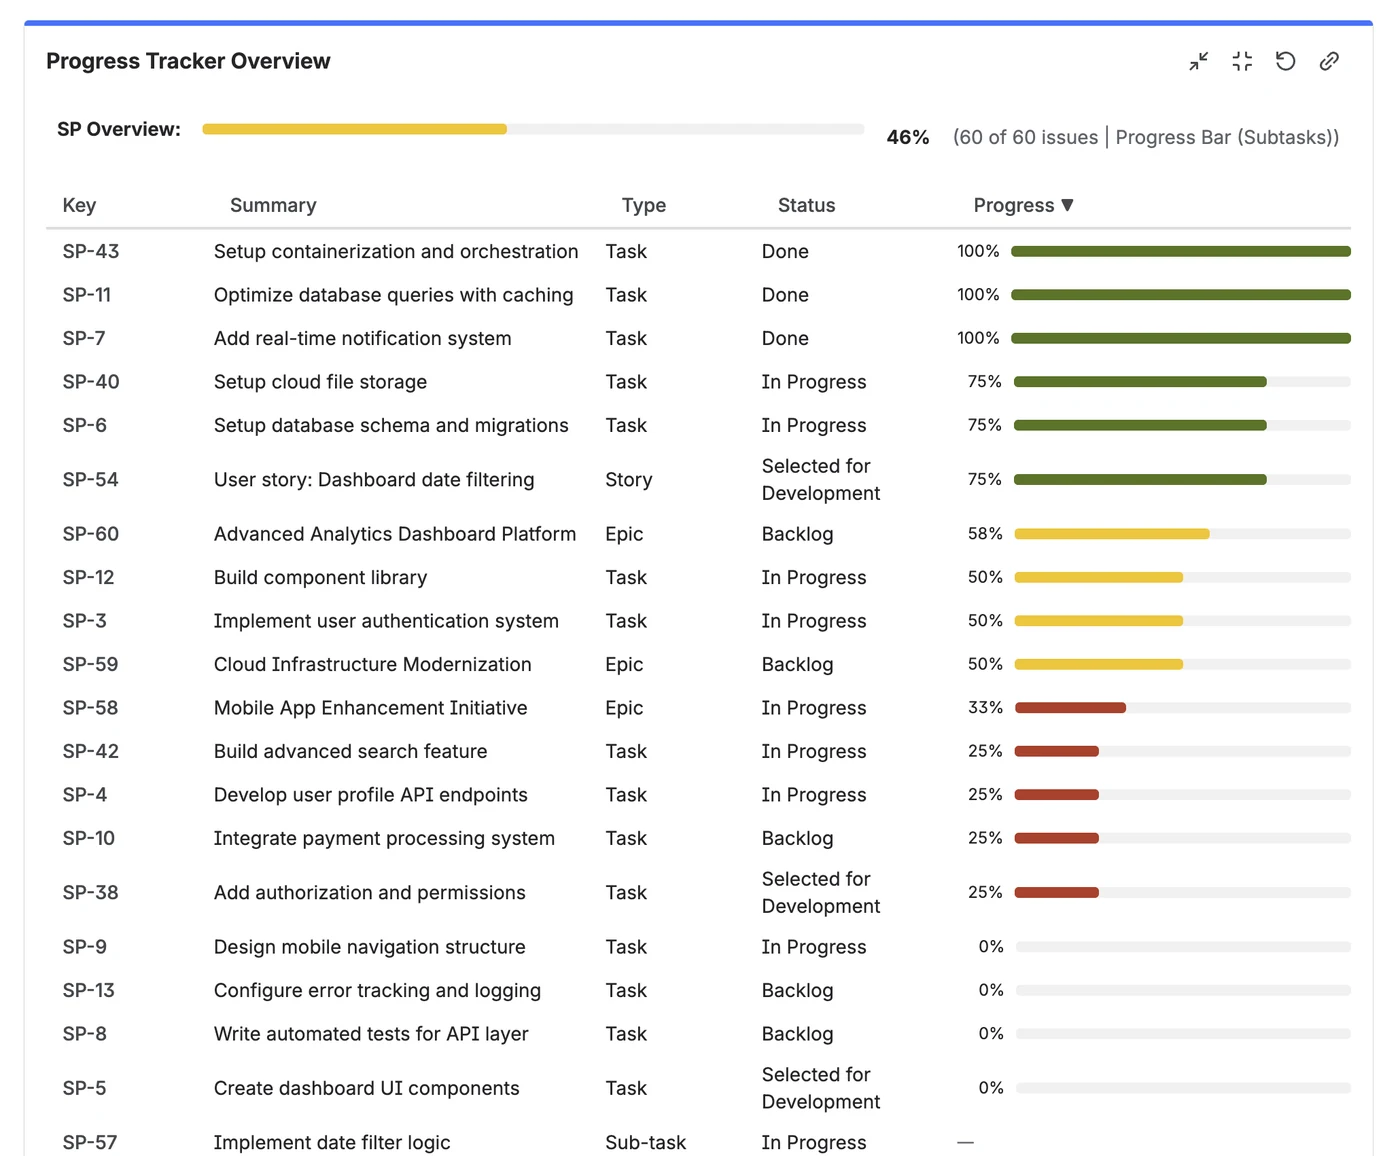
How to Add the Gadget
- Open any Jira Dashboard.
- Click Add gadget.
- Search for Progress Tracker Overview.
- Click Add.
- In the gadget's edit mode, select a Project and a Progress Calculation mode from the dropdown.
- (Optional) Add a JQL filter to narrow the gadget to a specific subset of issues — for example, a single sprint, a label, or an assignee.
- The gadget displays a sortable table with all issues and their current progress.
Refreshing the Data
Dashboard data is cached for up to 5 minutes to keep things fast. The gadget header shows how long ago the data was loaded (e.g. "5 min ago"). Click the Refresh button in the gadget header to fetch the latest data immediately.
JQL Filter
The JQL filter field accepts any valid Jira Query Language expression — including advanced
filters with a ORDER BY clause. The gadget combines your filter with the selected
project automatically, so you only need to write the additional conditions.
Common examples:
sprint in openSprints()— only issues in the active sprint.assignee = currentUser()— the current viewer's open issues.labels = "frontend" ORDER BY rank— filter by label, ordered by backlog rank.
If Jira rejects the filter (invalid syntax, unknown field, no permission), the gadget displays a clear error message with the reason, so you can fix the filter in place rather than seeing an empty table.
Large Projects
For very large projects, the gadget loads a bounded set of initial results to keep dashboards fast and responsive. If more matching issues exist than were loaded, the gadget shows a note at the top of the table telling you exactly that. To see the rest, refine the JQL filter (for example, scope it to a single sprint, epic, or label).
10. What's Included
Every feature is available to all users — no feature gates, no upgrade prompts. Free for teams up to 10 users.
| Feature | Included |
|---|---|
| Manual Progress Bar (drag slider) | Yes |
| Status-Based Progress (auto-calculated) | Yes |
| Subtask Progress (auto-calculated) | Yes |
| Dashboard Gadget (project overview) | Yes |
| Custom color thresholds | Yes |
| Custom status mappings | Yes |
| Color-coded list view columns | Yes |
| Email support | Yes |
11. FAQ & Troubleshooting
The progress bar shows 0% even though the issue has a status mapped.
Click Recalculate All Fields in the Admin Settings to sync all fields. This is needed after you first set up status mappings or change them.
I only see the manual field type — where are the others?
Each field type must be added separately as a custom field. Go to Jira Settings → Issues → Custom fields → Create custom field and search for "Progress Bar" to see all three types.
Can I use multiple field types on the same issue?
Yes! You can add all three fields to the same issue. For example, use the Manual bar for overall progress and the Subtask bar to track child issue completion side-by-side.
Do progress bars update automatically?
Status and Subtask fields recalculate automatically every time you open an issue, so you always see the latest value. Manual fields only update when a user moves the slider.
The Status or Subtask field shows a number input during issue creation — can I edit it?
No — these fields are read-only during creation. They display "—" (Status) or "Auto-calculated after creation" (Subtasks) to indicate the value will be set automatically once the issue is saved. There is nothing to enter manually.
The Recalculate button is greyed out or shows a future date.
Recalculation is limited to once every 7 days to keep resource usage low. The admin page shows the exact date when the next run becomes available. Individual issue fields recalculate automatically every time you open them, so a manual recalculation is rarely needed.
I changed the color thresholds but the bars still show old colors.
Make sure you clicked Save in the Admin Settings. Then refresh the issue page. The new thresholds apply immediately to all fields.
The dashboard gadget shows data that seems out of date.
Dashboard data is cached for up to 5 minutes. Click the Refresh button in the gadget header to load the latest data immediately.
The dashboard gadget shows a note that more issues exist than are displayed.
For very large projects, the gadget loads a bounded initial result set to keep dashboards fast. When more matching issues exist than were loaded, the gadget shows a note at the top of the table. Refine the JQL filter (for example by sprint, epic, label, or assignee) to bring the result set within the displayed limit.
The dashboard gadget shows an error after I added a JQL filter.
The gadget validates the filter against Jira and displays the exact error message when the
filter is rejected — for example invalid syntax, unknown field, or missing browse permission
on a referenced project. Fix the highlighted issue in the gadget configuration and the table
reloads automatically. Filters that include an ORDER BY clause are supported.
I added the field to a new project but existing issues show "—".
Status and Subtask fields calculate their values when you open an issue. Existing issues that haven't been viewed yet will show "—" until someone opens them. To immediately populate all issues, use the Recalculate All Fields button in Admin Settings.
Are progress values available for JQL search?
Yes. Every time someone opens an issue, the computed progress value is saved to Jira's database and becomes available for JQL queries, REST API, and list view columns. Issues that haven't been viewed since their last status change may show a slightly older value in JQL results.
Where is my data stored?
All configuration data is stored in Atlassian Forge Storage within your Jira Cloud instance. No data is sent to external servers. The app runs entirely on Atlassian infrastructure (Runs on Atlassian).
How do I uninstall?
Go to Jira Settings → Apps → Manage apps, find Visual Progress Tracker, and click Uninstall. This removes all app configuration data. Custom field values remain in Jira until you delete the custom fields.
12. Support
Need help? We're here for you.
- Email: support@janekbehrens.de
- Response time: Within 24 hours on business days.
Privacy Policy · Terms of Service · Impressum · © 2026 Janek Behrens