The gap between code and documentation
Most engineering teams have some version of the same problem: the code evolves, but the Confluence page from the last sprint planning stays unchanged. Updating documentation competes with shipping features, so documentation loses — every time.
The root cause isn't laziness. It's friction. Documentation lives in a different tool, in a different context, requiring a manual context switch at the moment engineers are most focused on code. The fix isn't to add more documentation reminders to the ticket workflow. It's to make documentation update itself.
CodeDoc AI for Confluence connects your GitHub repository to Confluence via a webhook trigger. When code is pushed or a pull request is merged, the app reads the repository, sends the relevant files to your AI provider, and publishes updated documentation to the target Confluence page — automatically.
What you need: A Confluence Cloud instance with CodeDoc AI installed, a GitHub account, and an API key from one of the supported AI providers (Anthropic, OpenAI, or Google Gemini). The AI key is your own — the app uses BYOK (Bring Your Own Key), meaning your code never passes through the app's own servers.
How the pipeline works
Before setting anything up, it helps to understand the full flow:
The app is built on Atlassian Forge, which means it runs entirely on Atlassian's own infrastructure. There are no external servers involved between GitHub and Confluence — only the AI provider you choose receives your code, using the API key you supply.
Step 1 — Create a GitHub Personal Access Token
CodeDoc AI needs read access to your repository. The recommended approach is a Personal Access Token (PAT) with the repo scope (read access is sufficient — the app never writes to your repository).
Create one at GitHub → Settings → Developer settings → Personal access tokens. For fine-grained tokens, select "Repository contents: Read-only". For classic tokens, tick the repo scope. GitHub's full token documentation is at docs.github.com.
Copy the token immediately — GitHub will not show it again.
Step 2 — Connect GitHub in CodeDoc AI
Open CodeDoc AI from the Confluence Apps menu and go to Settings → Git Providers. Select GitHub, paste your access token, and click Connect & Validate. The app verifies the token and confirms access.
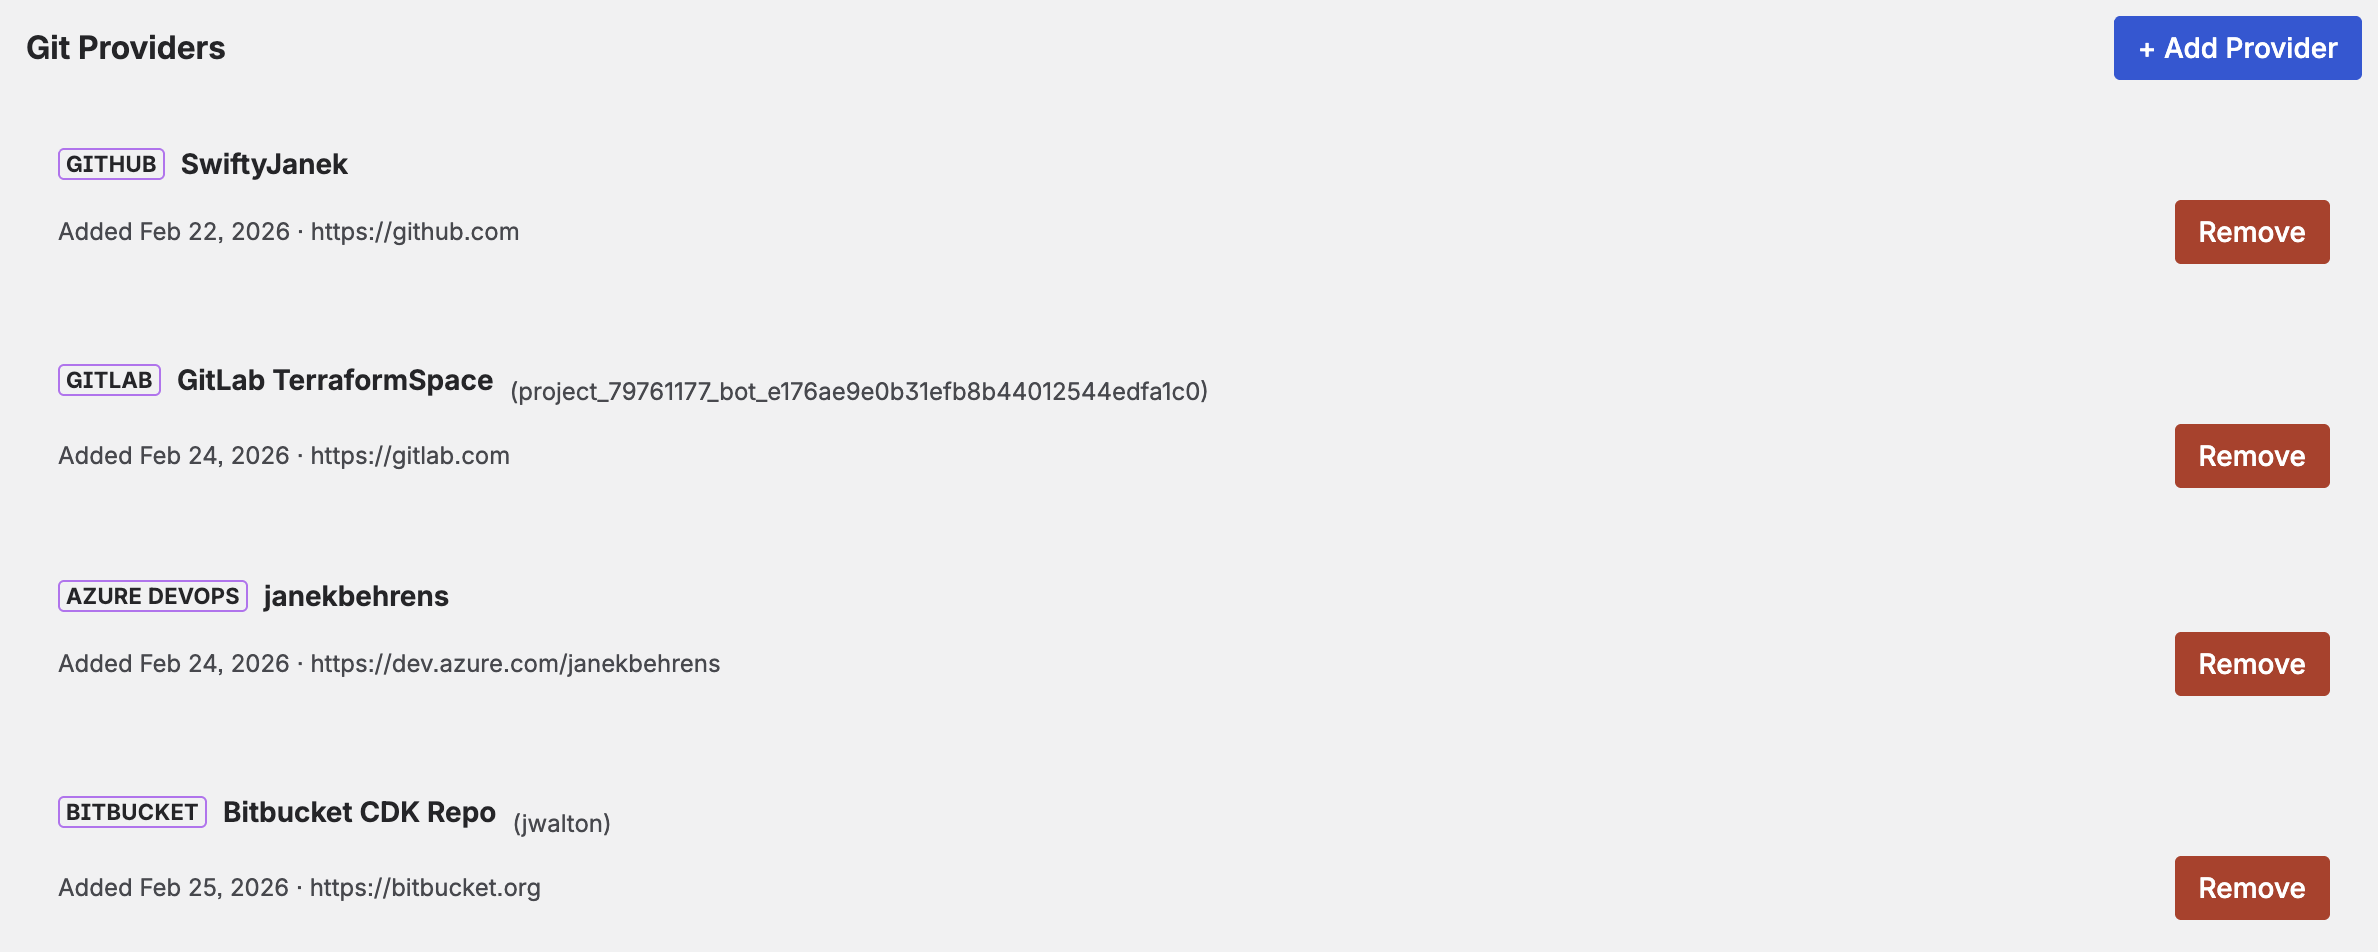
Git Provider settings — connect GitHub with your personal access token
If you use multiple Git providers (for example, both GitHub and GitLab), you can add them all here. You can also give each connection a display name, which makes it easier to identify when selecting repositories later.
Step 3 — Add your repository
Go to the Repositories tab. Click Browse Repos to see all repositories the token can access, use the search field to filter, and click Add Selected. Alternatively, click Add URL and paste the repository URL directly — this works for any token type and any visibility level.
When adding by URL, you also set the branch to document (default: main). If your main branch has a different name, change it here.
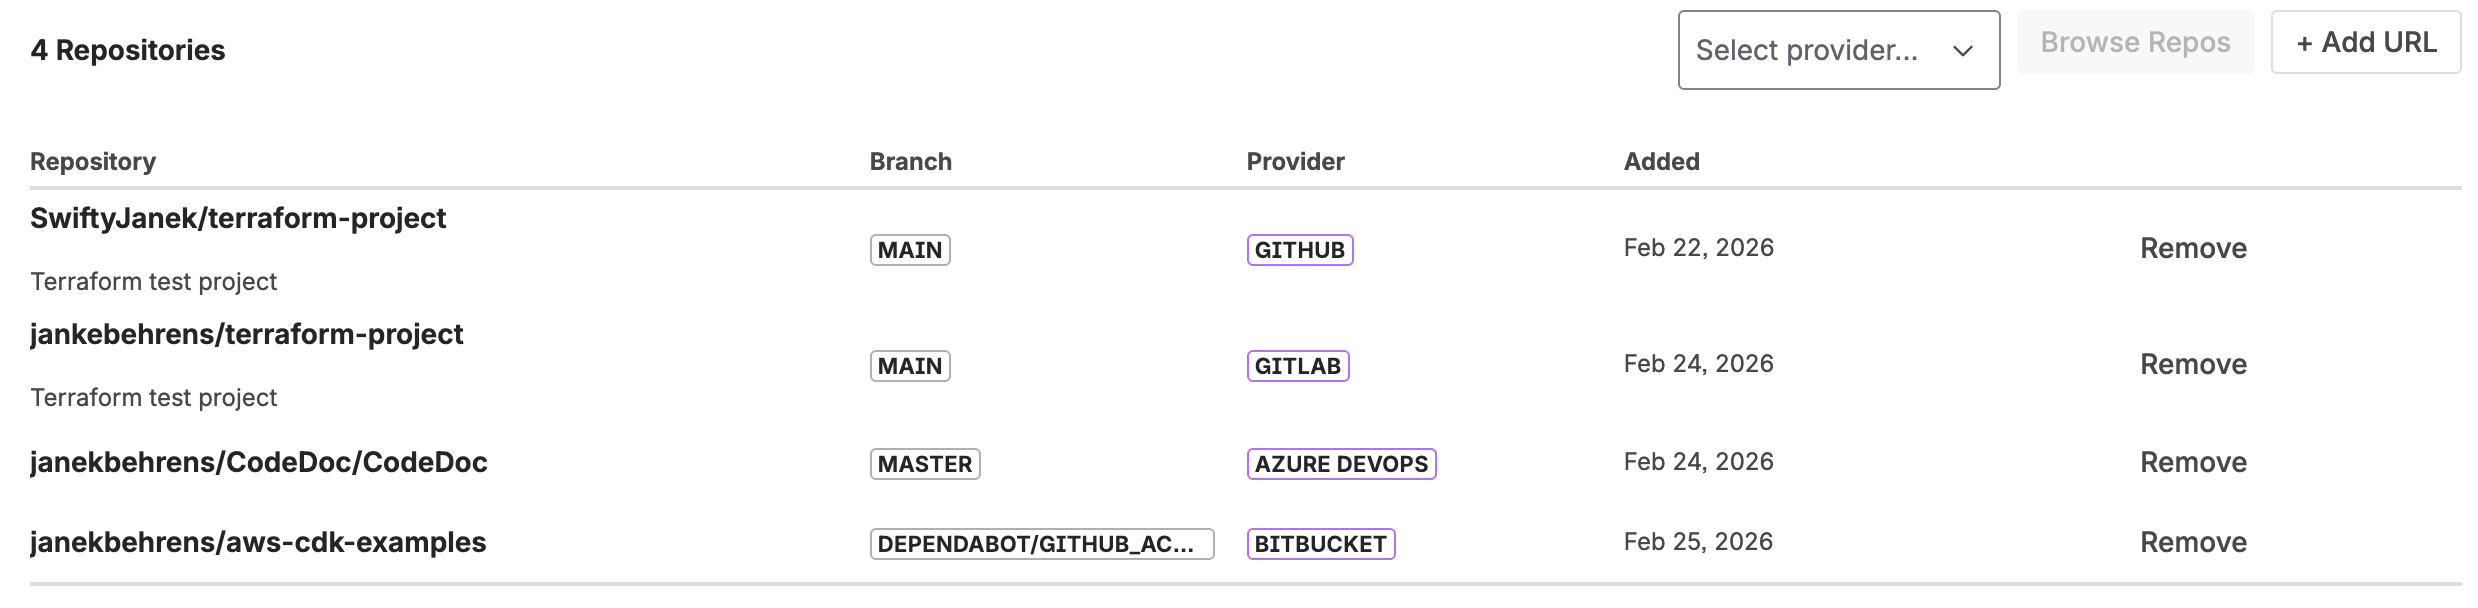
Browse and add GitHub repositories — or paste a URL directly for any visibility level
Step 4 — Create a documentation job
A job is what ties everything together: which repository, which documentation style (preset), which language, and where the result goes in Confluence. Go to the Jobs tab and click Create Job.
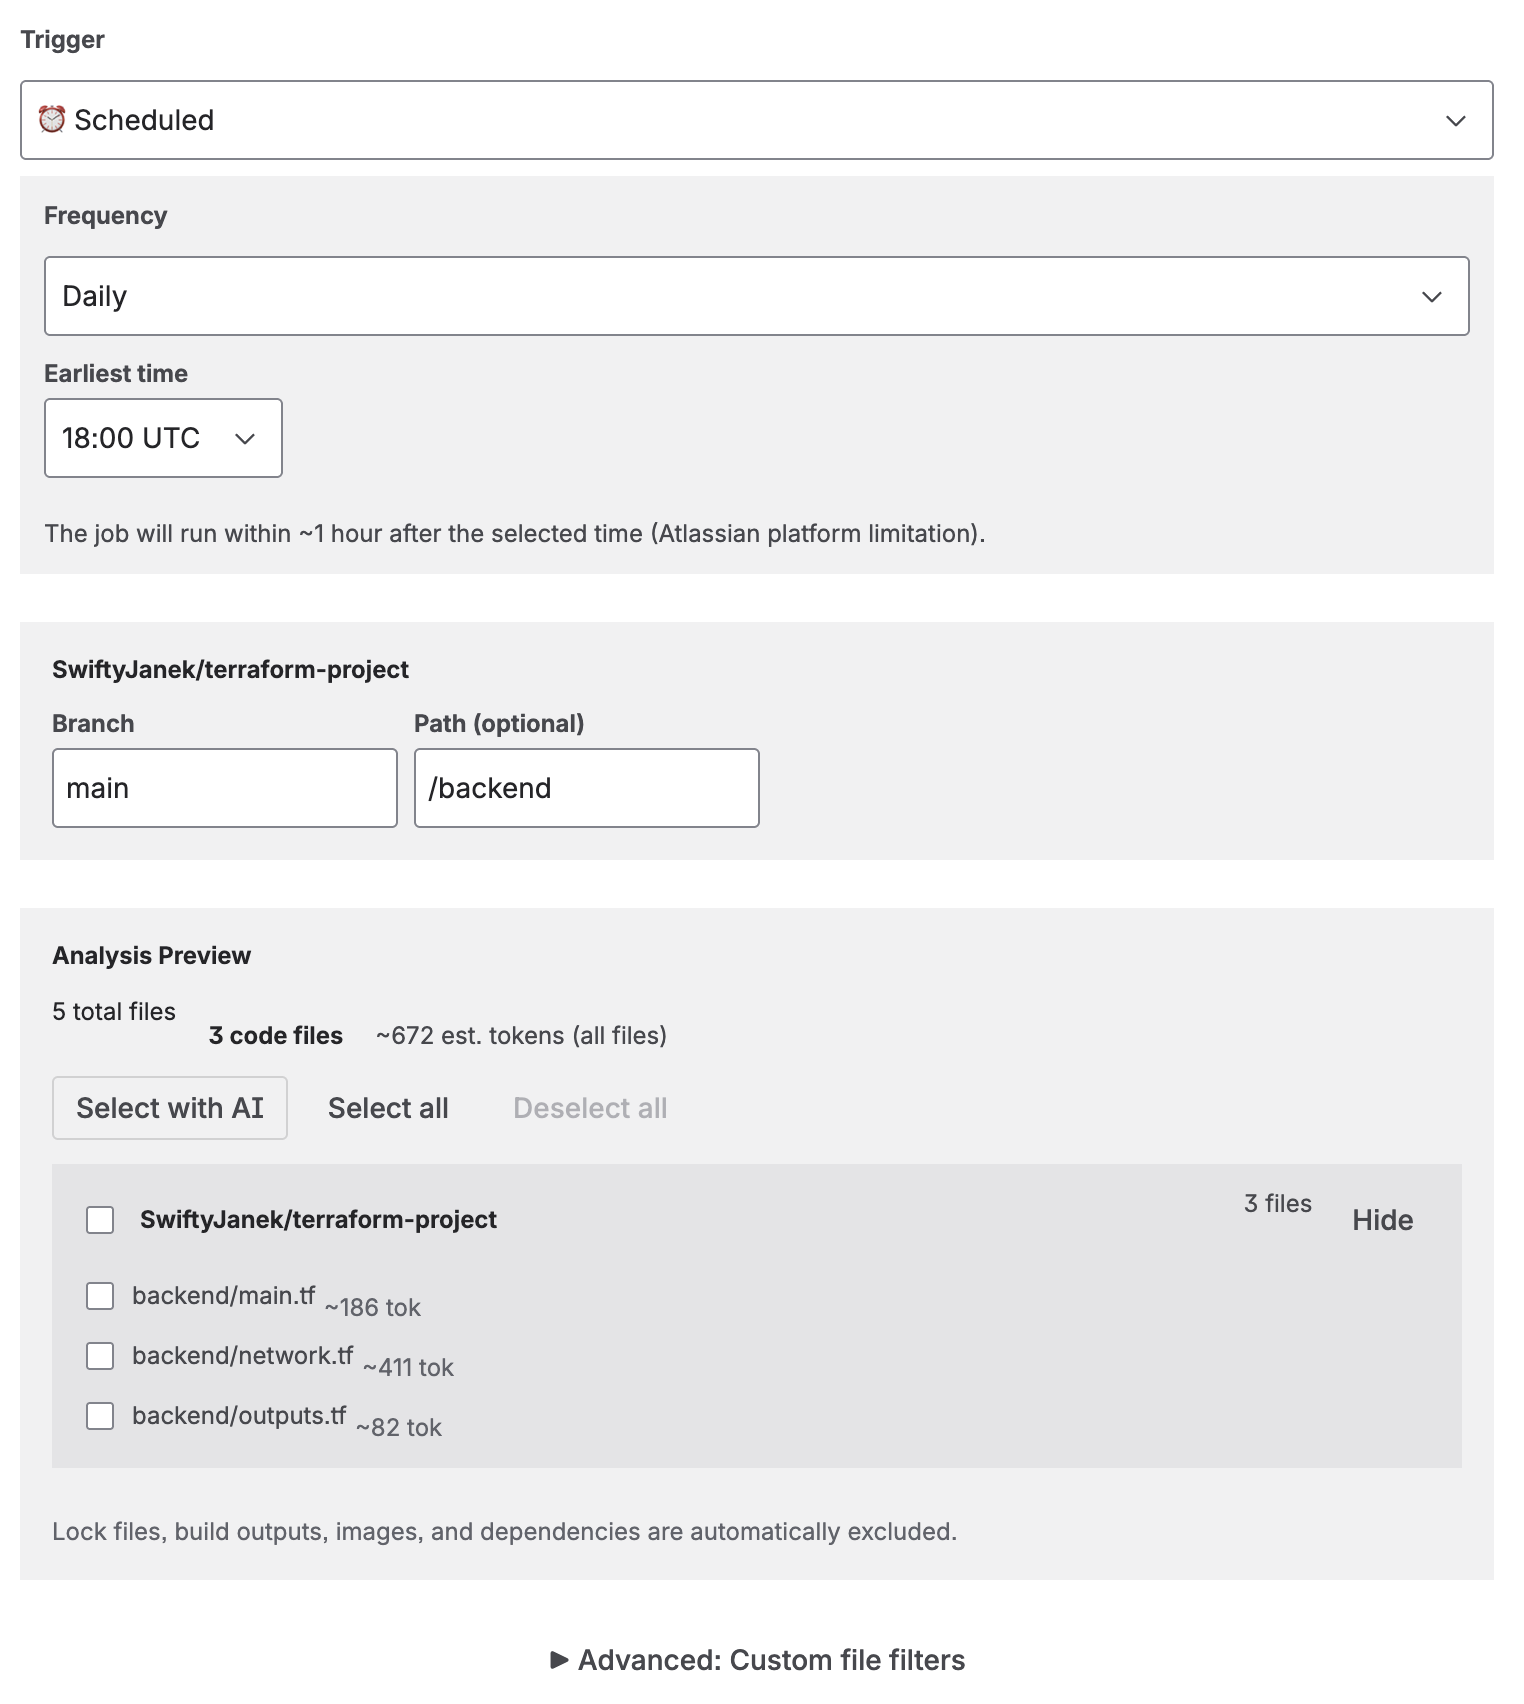
Job creation — select the repository, preset, language, and trigger type
The key settings for a GitHub-connected job:
- Repository: Select the one you just added.
- Preset: Choose a documentation style. Developer Documentation is a good starting point — it generates 9 structured sections including architecture, API reference, and troubleshooting. See the full preset list for all 8 options.
- Language: The language in which the page will be written. 10 languages available including English, German, French, and Japanese.
- Trigger: Select On Commit (every push) or On Merge (only merged pull requests). For most teams, On Merge avoids generating documentation for every work-in-progress push.
- Confluence Space: The space where the page will be created or updated.
Tip: AI file selection. For large repositories, enable AI-powered file selection before saving the job. The AI analyzes your file names and structure, picks the most relevant source files, and generates documentation from those only — lower token cost, better-focused output.
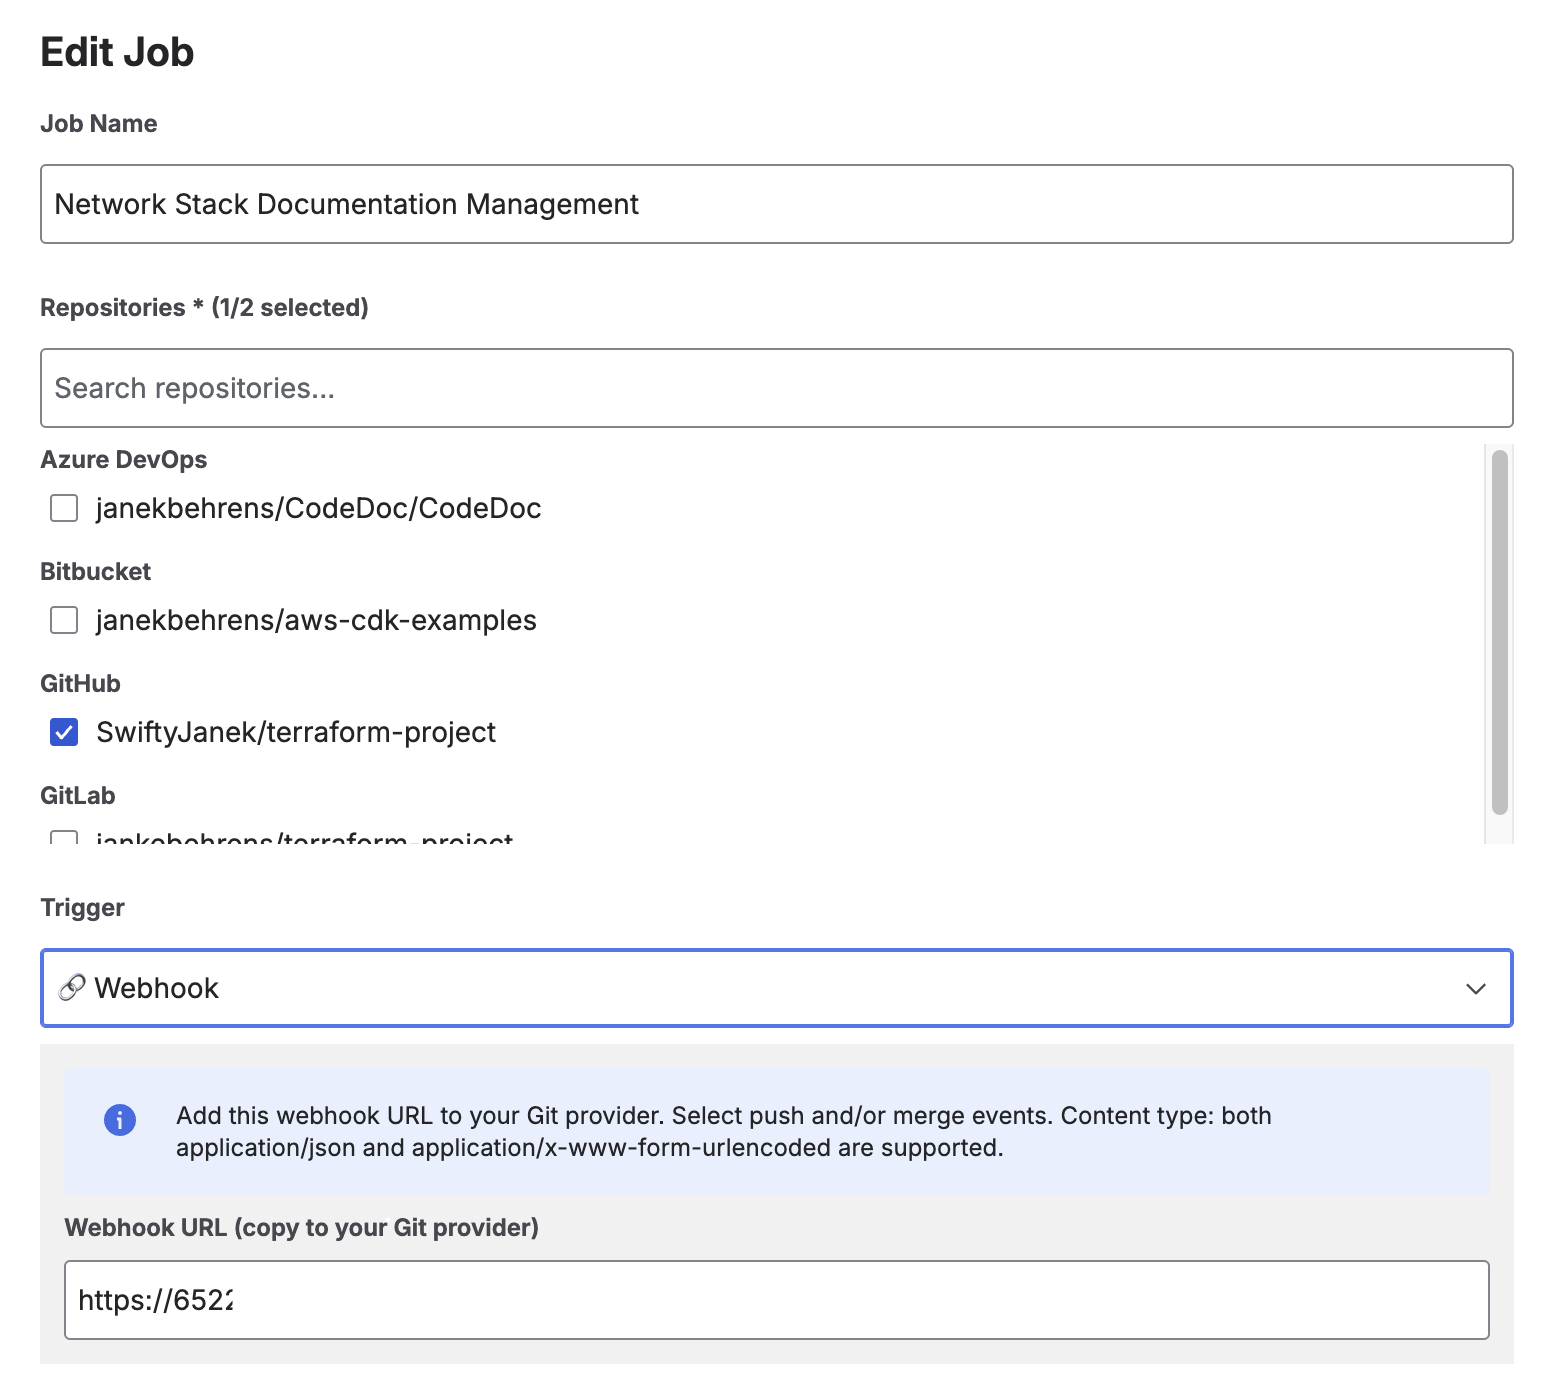
Step 5 — Set up the GitHub webhook
When you select On Commit or On Merge, the job creation screen shows a Webhook URL. Copy it — you'll paste it into GitHub in the next step.
The webhook URL appears automatically when you select an automatic trigger
In GitHub, go to your repository → Settings → Webhooks → Add webhook:
-
1Paste the Webhook URL from CodeDoc AI into the "Payload URL" field.
-
2Set Content type to
application/json. -
3Under "Which events would you like to trigger this webhook?": select Just the push event for On Commit, or Let me select individual events → Pull requests for On Merge.
-
4Click Add webhook. GitHub will send a ping event — the app accepts it silently.
You only need one webhook URL for all jobs. The app matches incoming GitHub events to the correct jobs by repository URL and branch name. Full GitHub webhook documentation is at docs.github.com.
Step 6 — Generate and review
After the webhook is registered, push a commit to the branch (or run the job manually from the Jobs tab to test immediately). The app reads your repository, passes the selected files to the AI, and publishes the result as a Confluence page.
Every generation is logged in the Generation History view with the token count, file count, AI model used, timestamp, and a direct link to the Confluence page.
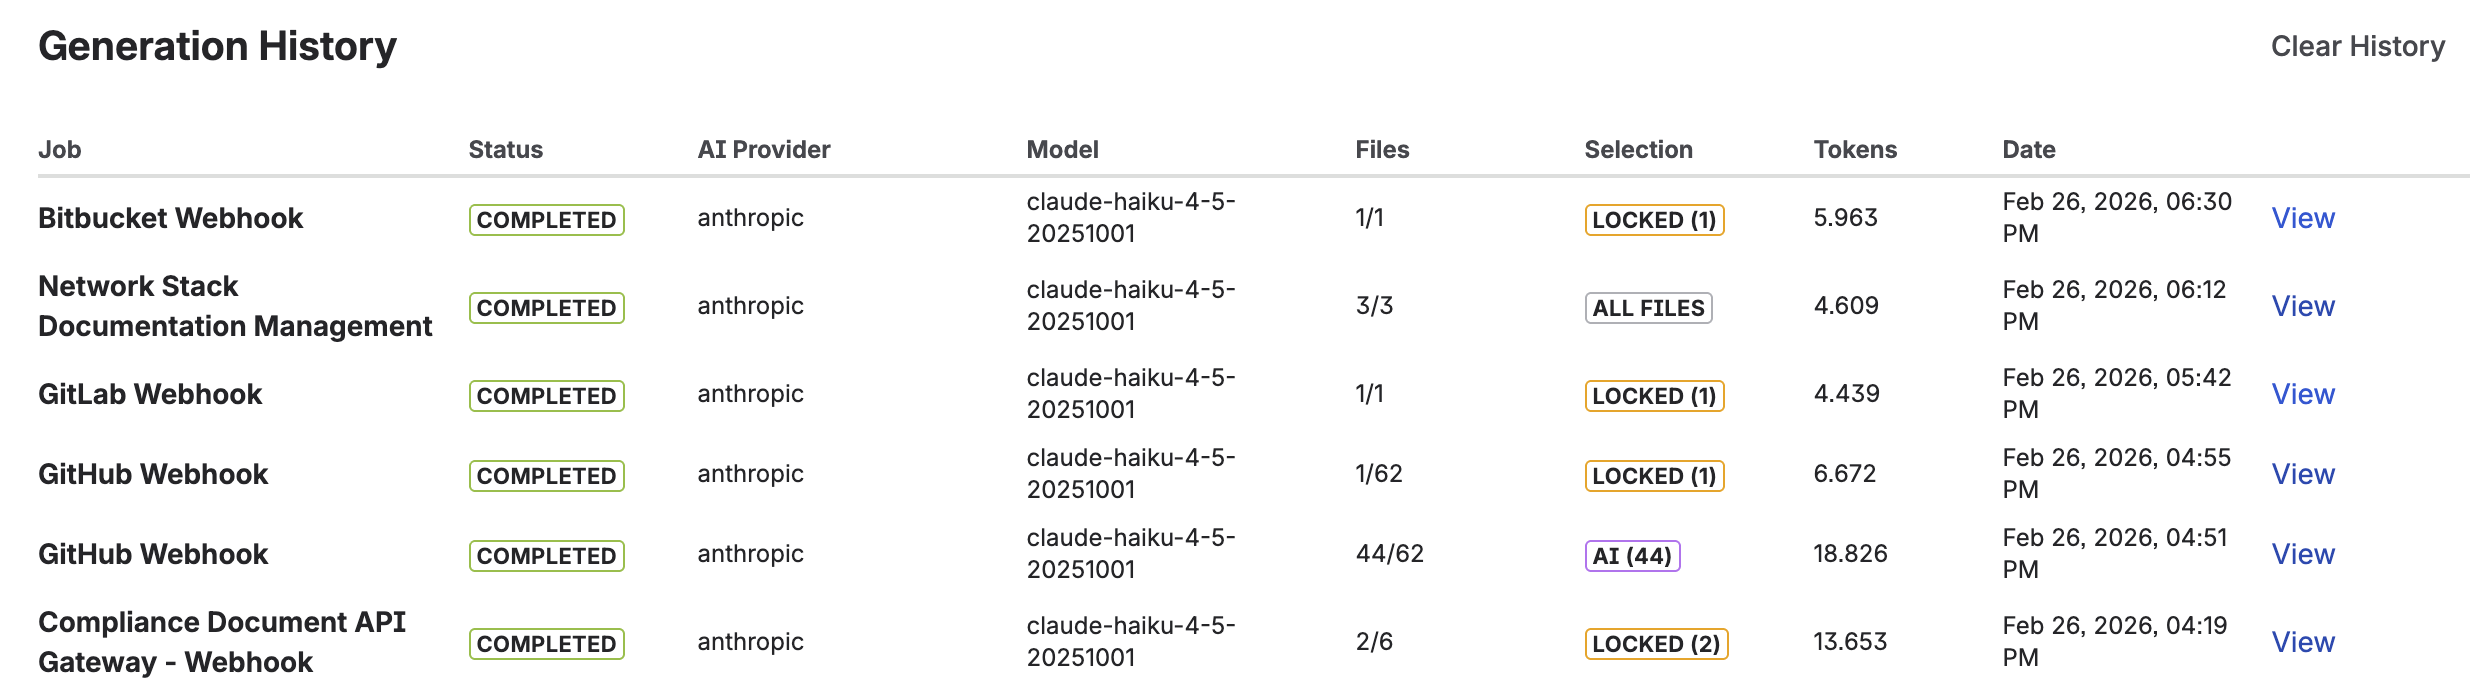
Generation History — every run is logged with token usage, file count, and a direct link to the Confluence page
Optional: review before publishing
If you want a quality gate before documentation goes live — for example in regulated environments or for customer-facing docs — enable Require approval before publishing in the job settings. The generated page is saved as a Confluence draft with a [DRAFT] prefix. You review it from the Dashboard and publish or discard it manually.
For internal developer documentation that updates frequently, approval adds friction. For compliance documentation or onboarding guides that go to a wider audience, it's a sensible safeguard.
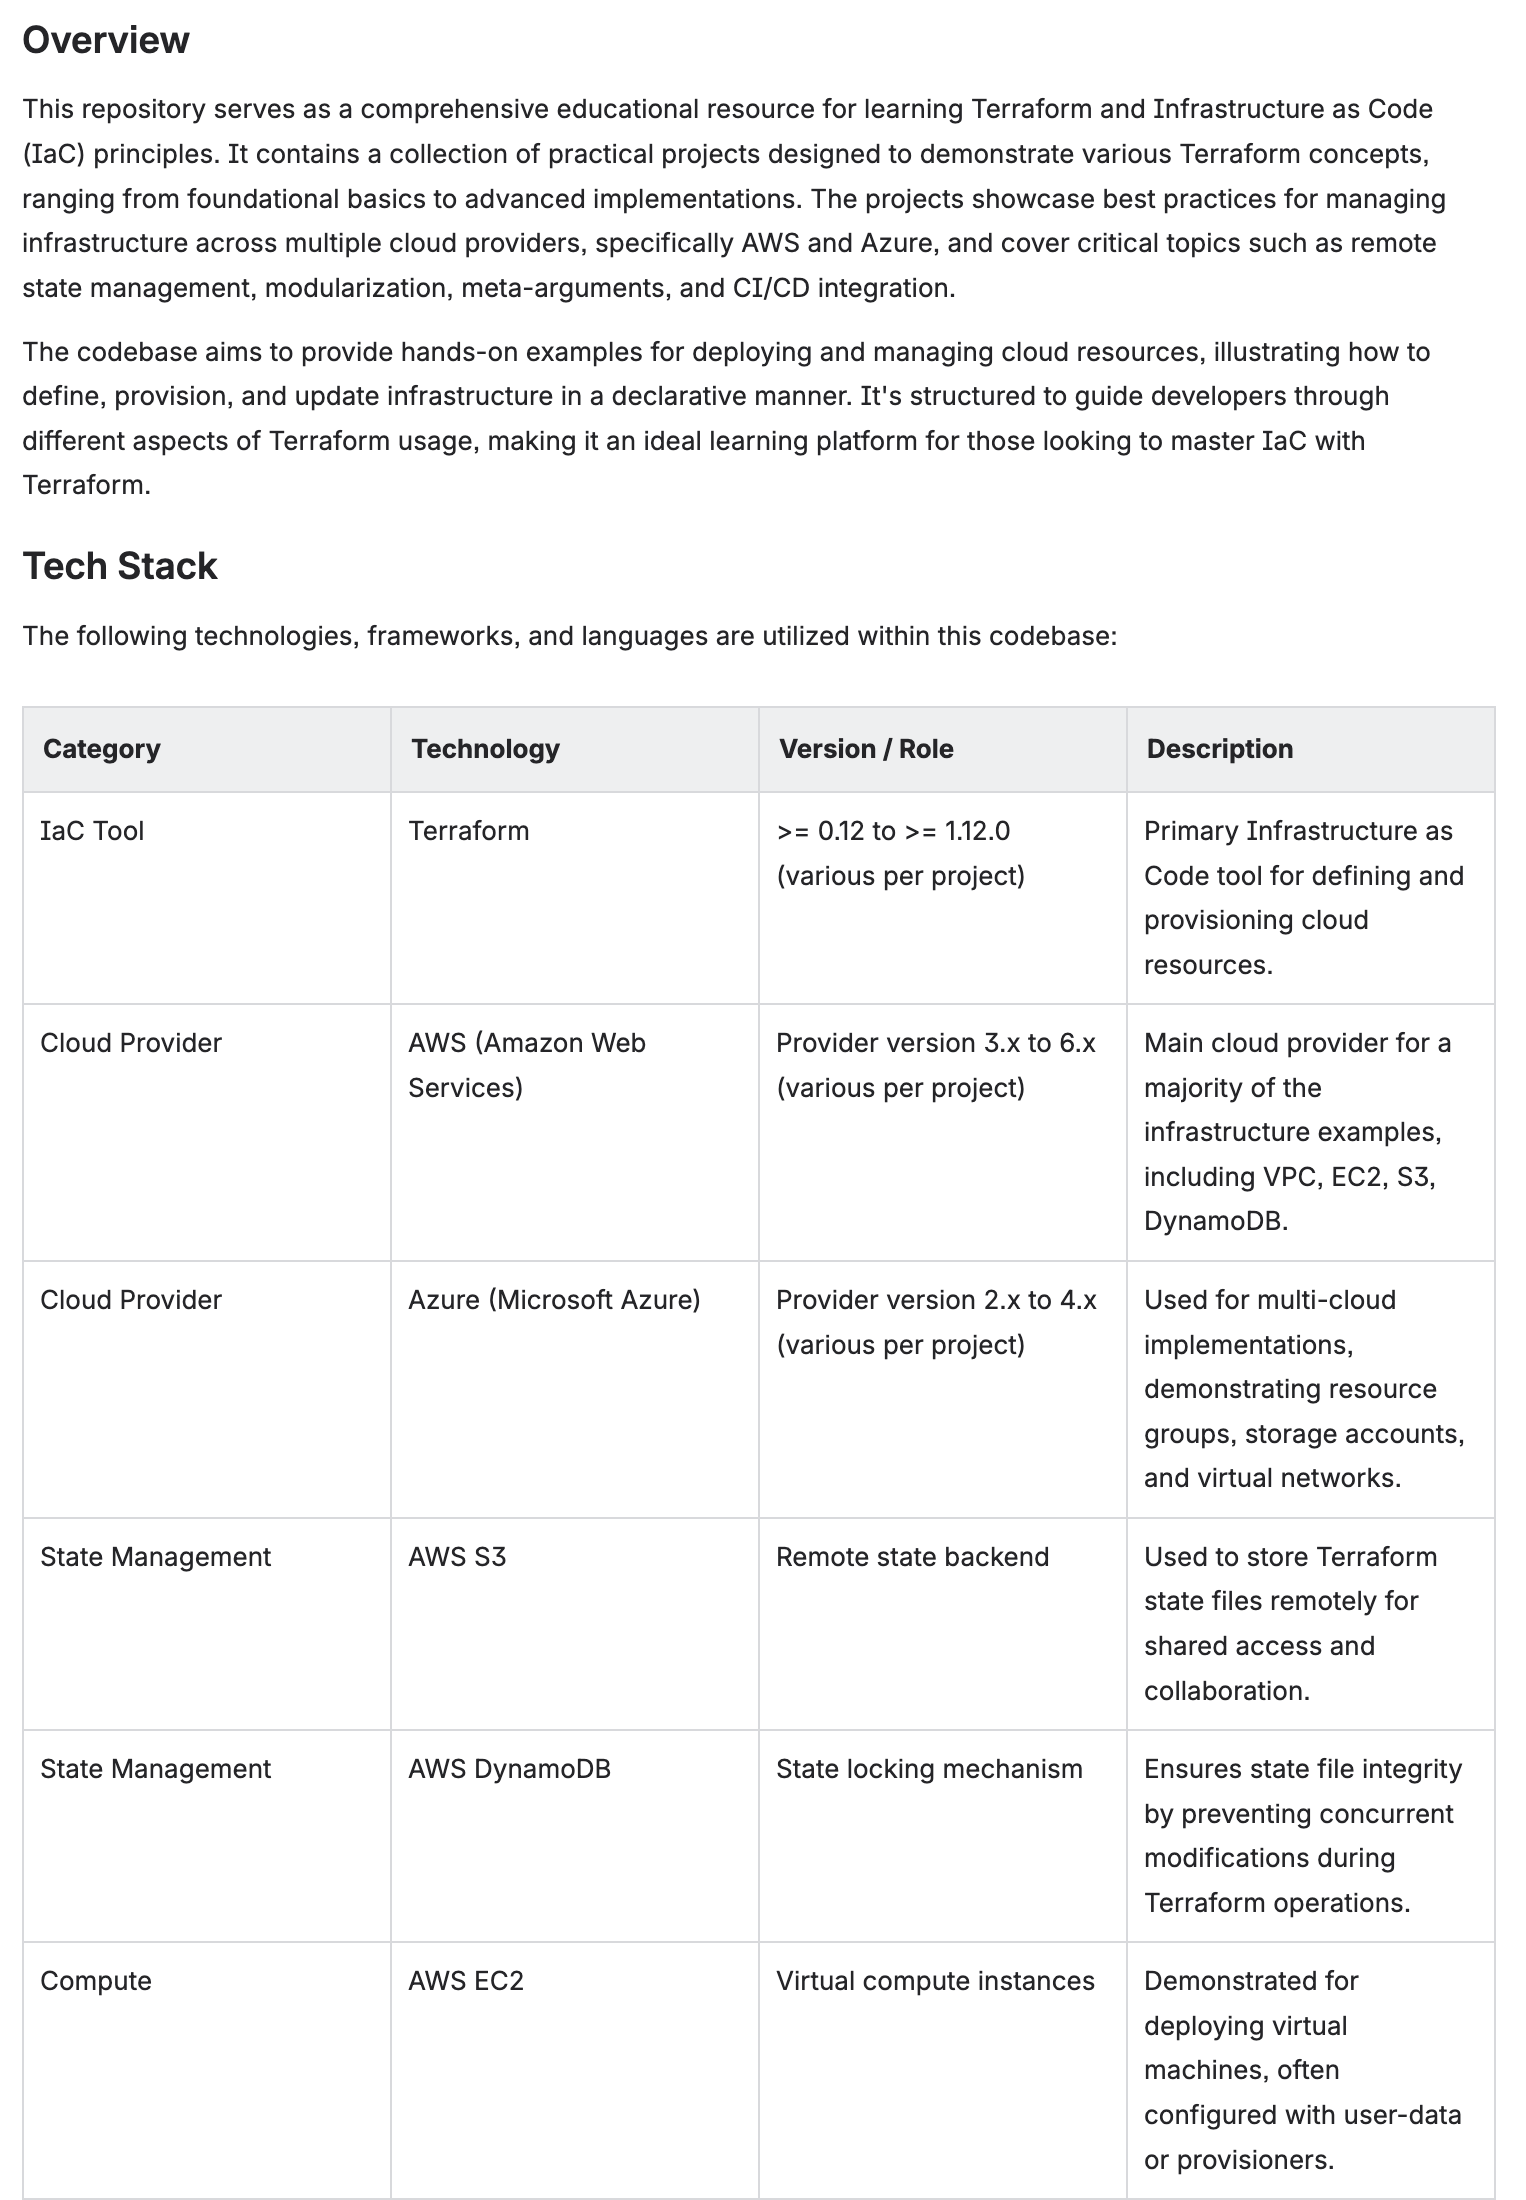
What the output looks like
Here is an example of generated documentation in Confluence — created automatically from a Terraform infrastructure repository using the Developer Documentation preset. The AI extracted the tech stack, described the architecture, documented the API surface, and listed dependencies — all formatted as a structured Confluence page.
Auto-generated Confluence page — structured overview with tech stack, architecture, and API reference
Frequently asked questions
Can Confluence automatically pull documentation from GitHub?
Confluence does not have a built-in GitHub sync. CodeDoc AI bridges the gap: it reads your repository via webhook, generates documentation using your AI provider, and publishes it as a native Confluence page — triggered by commits, PR merges, or a schedule.
How do I connect GitHub to Confluence?
Create a GitHub Personal Access Token with repo read scope, add it in CodeDoc AI's Git Provider settings, add your repository, create a documentation job with an automatic trigger, and register the app's webhook URL in your GitHub repository settings. The complete walkthrough is in this article.
Does GitHub documentation automation work with private repositories?
Yes. The app uses your personal access token to authenticate with GitHub. Public and private repositories both work as long as the token has read access.
How often does the documentation update?
On Commit triggers regenerate documentation on every push. On Merge triggers regenerate only when a pull request is merged. Scheduled triggers run daily, weekly, or monthly. You can also run any job manually at any time.
Will running the job again create a duplicate Confluence page?
No. The job updates the existing Confluence page. If the approval workflow is enabled, the update appears as a draft first — no duplicates are created in either case.
What AI providers can I use with CodeDoc AI?
Anthropic (Claude), OpenAI (GPT models), and Google (Gemini). You bring your own API key — the app charges no per-generation fee. Google Gemini has a free tier, which means you can run generations at zero AI cost while evaluating the app.
Connect your GitHub repository to Confluence
CodeDoc AI is free to try — all triggers, all presets, and AI file selection included from day one.
Try it free on Marketplace →